

Toolbar
- Collapse toolbar.
- Settings.
- Chart screenshot. Settings and screenshot storage location right here.
- Order management panel.
- Danger supervisor and Buying and selling report.
- Data panel.
- Chart management panel.
- Buying and selling.
- OCO orders.
- Normal order closure.
- Duties.
- Trailing cease.
- Breakeven.
- Partial closure.
- Alerts.
- Server time. Utilizing settings you possibly can change the displayed data to:
- Server time | Time till bar closes
- Revenue in forex
- Revenue in factors
- Revenue in forex | Revenue in factors
- Revenue in forex | Quantity of open positions
- Present/cover Toolbar.
- Collapse toolbar.
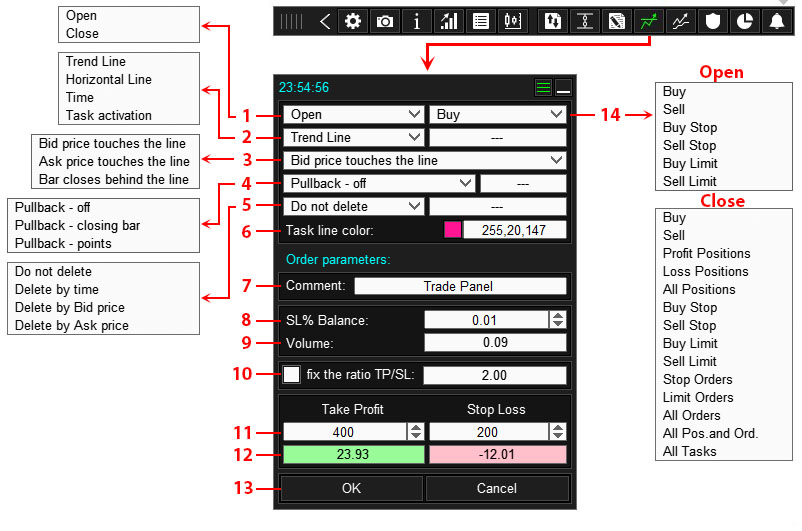
Panel for Commerce
“Open” tab
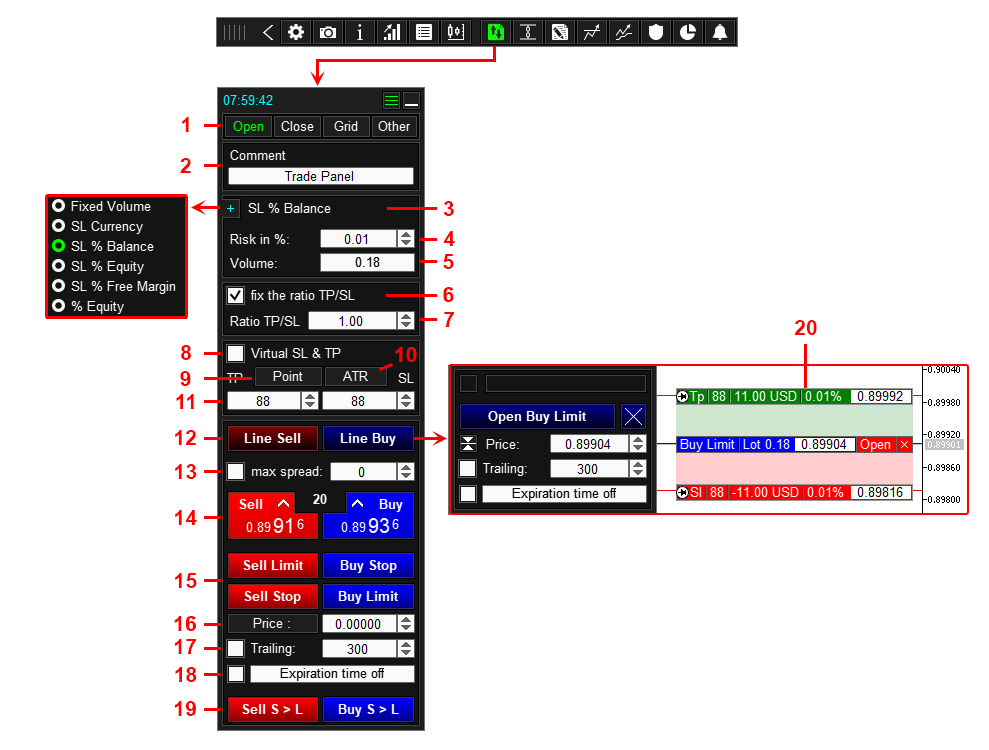
- Buttons for switching tabs. The variety of tabs, their names and contents are configured right here.
- Remark to the order.
- The strategy for calculating the order quantity.
- The chance measurement or the order quantity, with the Mounted Quantity methodology.
- The calculated quantity in response to the required threat.
- Repair the ratio of Take Revenue to Cease Loss. The ratio perform is utilized as follows:
- in case you change the SL measurement, the panel will routinely change the TP measurement in response to the next method: TP = SL * Ratio,
- in case you change the TP measurement, the panel will routinely change the SL measurement in response to the next method: SL = TP / Ratio.
- The scale of the ratio between Take Revenue and Cease Loss.
- Open an order with Digital Cease Loss and Take Revenue.
- Button for switching the unit of measurement of Take Revenue and Cease Loss (Factors/Value).
- Use the ATR indicator readings for the dimensions of Take Revenue and Cease Loss. Whenever you click on the button, the panel will set the dimensions of Take Revenue and Cease Loss equal to the worth of the ATR indicator. The perform is configured right here.
- Take revenue and Cease loss in factors or value (relying on the place of button 9).
- Buttons for switching to the order opening mode utilizing labels on chart 20.
- Most unfold filter. If the present unfold exceeds the required one when the place opening button is pressed, the place opening might be canceled.
- Buttons for rapidly opening positions.
- Buttons for rapidly opening pending orders.
- Value for opening a pending order (for buttons 15). May be set in factors (distance from the present value to the pending order value), to do that, click on on the “Value:” button.
- Pending order trailing. The panel will transfer the pending order following the present value. The gap between the worth and the pending order is specified within the enter area. The panel strikes the pending order solely within the path of the present value.
- Expiration of the pending order. The time upon reaching which the pending order might be deleted.
- Button for switching to the BuyStopLimit SellStopLimit order opening mode (MT5 solely).
- Labels for opening an order. Used to open an order utilizing strains on the chart. Designed to visualise the placement of buying and selling ranges on the chart, ensures their correct set up on assist and resistance ranges. Configured right here.
Quantity calculation methodology
The lot for a brand new order is calculated in certainly one of six methods:
| Technique | Description |
|---|---|
| Mounted lot | The panel doesn’t calculate the lot. When opening an order, a hard and fast lot measurement specified by the person is used. |
| SL in forex | Danger within the deposit forex (for instance $200). * |
| SL in % of steadiness | Danger as a share of steadiness. * |
| SL in % of fairness | Danger as a share of the fairness. * |
| SL in % of free margin | Danger as a share of free margin. * |
| % of fairness | The lot is about as a share of fairness. The utility routinely recalculates the lot each time the fairness measurement is modified. |
* The lot measurement is calculated in such a approach that the loss from closing a place by cease loss might be equal to the required threat worth. The utility calculates the lot itself, the dealer solely must set the danger worth.
Instance:
Lot calculation methodology: SL in % of steadiness.
Danger per commerce: 3%.
Present steadiness: $1,000.
With the required parameters, the loss from a commerce when closing it by cease loss might be: $1,000 * 3% = $30.
Quantity calculation is configured right here.
Digital Cease Loss and Take Revenue
Digital cease loss and take revenue are value ranges tied to an order (place). When the present value touches these ranges, the place might be closed. Digital stops carry out the identical features as common stops, they permit you to repair a loss and revenue.
What are digital sl and tp for?
The one function of digital cease loss and take revenue is to cover them from the dealer. The dealer doesn’t see digital sl and tp and due to this fact will be unable to knock them out by manipulating the worth.
Why does the dealer not see digital sl and tp?
Cease loss and take revenue (let’s name them actual sl and tp) are saved on the dealer’s buying and selling server and are executed by the buying and selling server. Accordingly, the dealer is aware of the placement of the cease loss and take revenue. Digital sl and tp are saved within the panel and are executed by the panel. The panel itself displays the present value, and if the worth touches the digital sl or tp, the panel itself will shut the place.
Disadvantages of digital sl and tp:
- Since digital sl and tp are executed within the terminal, value slippage is feasible when closing a place.
- Since digital sl and tp are executed by the panel, they won’t work if the terminal or panel is turned off.
Digital cease loss and take revenue are configured right here.
Find out how to open a place
Technique #1:
- Enter the required parameters: Remark 2, Danger calculation sort and threat measurement 3,4. If you wish to change actual TP and SL with digital ones, allow test 8.
- Click on the “Line Promote” button in case you open Promote or “Line Purchase” in case you open Purchase 12.
- Utilizing labels 20 or fields 11, set the TP and SL costs. If needed, use the mounted ratio of 6,7, button 9 to modify Value / Level, button 10 if you wish to use the ATR indicator as TP and SL.
- Allow perform 13 if you wish to open a place provided that the present unfold is lower than the required one.
- Click on the Open Promote or Open Purchase button.
Technique #2:
- Enter the required parameters: Remark 2, Danger calculation sort and threat measurement 3,4. If you wish to change actual TP and SL with digital ones, allow test 8.
- Enter TP and SL in fields 11. If needed, use a hard and fast ratio of 6,7, button 9 to modify Value/Level, button 10 if you wish to use the ATR indicator readings as TP and SL.
- Allow perform 13 if you wish to open a place provided that the present unfold is lower than the required one.
- Click on the “Promote” or “Purchase” button 14.
Find out how to open a pending order
Technique #1:
- Enter the required parameters: Remark 2, Danger calculation sort and threat measurement 3,4. If you wish to change actual TP and SL with digital ones, allow test 8.
- Click on the “Line Promote” button in case you open Promote or “Line Purchase” in case you open Purchase 12.
- Utilizing labels 20 or fields 11 set the order opening value, TP and SL. If needed, use the mounted ratio 6,7, button 9 to modify Value/Level, button 10 if you wish to use the ATR indicator as TP and SL.
- Activate trailing 17 if you need the pending order to comply with the present value.
- Activate expiration 18 if you need the pending order to be deleted at a specified time.
- Click on the Open SellLimit/ SellStop or Open BuyLimit/ BuyStop button.
Technique #2:
- Enter the required parameters: Remark 2, Danger calculation sort and threat measurement 3,4. If you wish to change actual TP and SL with digital ones, allow the test 8.
- Enter the order opening value, TP and SL in fields 16 and 11. If needed, use a hard and fast ratio 6,7, button 10 if you wish to use the ATR indicator readings as TP and SL.
- Allow trailing 17 if you need the pending order to comply with the present value.
- Allow expiration 18 if you need the pending order to be deleted at a specified time.
- Click on the “SellLimit“, “SellStop“, “BuyLimit” or “BuyStop” button 15.
“Shut” tab
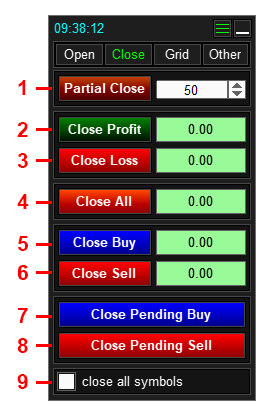
- Partially shut all positions.
- Shut worthwhile positions.
- Shut unprofitable positions.
- Shut all orders and positions.
- Shut Purchase positions.
- Shut Promote positions.
- Shut pending Purchase orders.
- Shut pending Promote orders.
- Apply near all symbols.
Find out how to shut orders and positions
To partially shut all positions, enter the % to shut and click on the 1 button.
To shut orders and positions of a given sort, click on the 2, 3, 5, 6, 7 or 8 button.
To shut all Orders and Positions, click on the 4 button.
To make the panel apply closing of orders and positions to all symbols, allow the checkbox 9.
“Grid” tab
This tab (block) is an addition to the “Open” tab, and is designed to configure the order grid. The order grid might be created when opening an order from the “Open” tab.
Additional for definition: Grasp order – is an order opened from the Open tab, that is the order ranging from which the grid is constructed.
If the order grid step is greater than 0 – the grid will encompass cease or restrict orders (relying on the Kind parameter).
If the order grid step is 0 – the panel will open a specified variety of orders, on the value of the grasp order. The order sort would be the similar because the grasp order (on this case, the Kind parameter will not be utilized).

| # | Description | Instance |
|---|---|---|
| 1 | Grid sort: Restrict– the order grid will encompass Restrict orders. | The grid is positioned within the path of the order’s loss. |
| 2 | Grid sort: Cease– the order grid will encompass Cease orders. | The grid is positioned within the path of the order revenue. |
| 3 | Variety of orders: Mounted – the variety of orders within the grid is mounted and is about by the person. | Within the enter area, we entered 5, so the order grid will comprise 5 orders + grasp order. |
| 4 | Variety of orders: Quantity / Max. quantity – this calculation methodology is used if the calculated quantity of the grasp order is bigger than the utmost quantity set by the dealer. If the calculated quantity is bigger than the utmost quantity, the panel will distribute the calculated quantity between a number of orders. The variety of orders is calculated routinely. | The utmost allowed quantity on the image is 100.00, The calculated quantity of the grasp order is 258.00, Whenever you click on on the button, 3 orders will open: the primary order with a quantity of 100.00, the second order with a quantity of 100.00, the third order with numerous 58.00. |
| 5 | Order Quantity: Quantity – the quantity of every grid order is mounted and is about by the person. | Within the quantity enter area we entered 0.3, so every grid order may have a quantity equal to 0.3. |
| 6 | Order Quantity: Quantity / Quantity – the calculated quantity of the grasp order might be distributed equally between the orders (if needed, the lot might be normalized). | The desired variety of grid orders is 4, Calculated quantity is 1.00, Whenever you click on on the button, 5 orders will open. Every order may have a quantity of 0.20 heaps (1.00/5). |
| 7 | Order quantity: Quantity * Coefficient – the quantity of every grid order might be equal to the quantity of the grasp order multiplied by the coefficient. | The calculated quantity of the grasp order is 1.5, Coefficient 2, accordingly, every order within the grid may have a quantity equal to three.0 (1.5 * 2). |
| 8 | Order Quantity: Arithmetic – the quantity of every order within the grid will correspond to the arithmetic development. | The calculated quantity of the grasp order is 1.0, The desired variety of grid orders is 4, The distinction within the arithmetic development is 1.5, accordingly, the grid orders may have the next volumes: 1# 2.5, 2# 3.0, 3# 4.5, 4# 6.0. |
| 9 | Order Quantity: Geometric – the quantity of every order within the grid will correspond to a geometrical development. | The calculated quantity of the grasp order is 1.0, The desired variety of grid orders is 4, The denominator of the geometric development is 2.0, accordingly, the grid orders may have the next volumes: 1# 2.0, 2# 4.0, 3# 8.0, 4# 6.0. |
| 10 | Order grid step: Mounted (pt) – the order grid step is mounted and is about by the person in factors. | Within the step enter area, we entered 100 pp, respectively, the space between grid orders might be 100 factors. If the grid step is 0, then the orders might be opened on the similar value at which the grasp order was opened. |
| 11 | Order grid step: % Grasp TP – the order grid step might be equal to the required a part of the grasp order take revenue. | Take revenue of the grasp order is 2000 factors, % Grasp TP 10%, accordingly the order grid step might be equal to 10% of 2000 = 200 factors. |
| 12 | Order grid step: % Grasp SL – the order grid step might be equal to the required a part of the cease lack of the grasp order. | Cease loss grasp order 2500 factors, % Grasp SL 10%, accordingly, the order grid step might be equal to 10% of 2500 = 250 factors. |
| 13 | Take revenue of the order grid: Take revenue value – the take revenue of every order is about on the value specified by the person. | Within the value enter area we entered 1.9453, accordingly the take revenue of every grid order might be set on the value of 1.9453. |
| 14 | Take revenue of the order grid: Take revenue factors – the take revenue of every order is about at a distance specified by the person. | Take revenue factors – 100 factors, The primary grid order purchase is opened at a value of 1.0000, the take revenue of this order might be at a value of 1.0100, The second grid order purchase is opened at a value of 0.9000, the take revenue of this order might be at a value of 0.9100, The third grid order purchase is opened at a value of 0.8000, the take revenue of this order might be at a value of 0.8100. |
| 15 | Take revenue of the order grid: Grasp TP value – the take revenue of every order is about on the take revenue value of the grasp order. | the grasp order has a take revenue at a value of 1.9453, accordingly the take revenue of every grid order might be set at a value of 1.9453. |
| 16 | Take revenue of the order grid: Grasp TP factors – the take revenue of every order is about on the distance that the take revenue of the grasp order has. | Take revenue of the grasp order in factors is the same as 100 factors, respectively The primary order of the purchase grid opened at a value of 1.0000 may have a take revenue at a value of 1.0100, The second order of the purchase grid opened at a value of 0.9000 may have a take revenue at a value of 0.9100, The third order of the purchase grid opened at a value of 0.8000 may have a take revenue at a value of 0.8100. |
| 17 | Cease lack of order grid: Cease loss value – the cease lack of every order is about at a value specified by the person. | Within the value enter area we entered 1.9453, accordingly the cease lack of every grid order might be set on the value of 1.9453. |
| 18 | Cease lack of order grid: Cease loss factors – cease lack of every order is about at a distance specified by the person. | Cease loss factors – 100 factors, The primary grid order purchase is opened at a value of 1.0000, the cease lack of this order might be at a value of 0.9900, The second grid order purchase is opened at a value of 0.9000, the cease lack of this order might be at a value of 0.8900, The third grid order purchase is opened at a value of 0.8000, the cease lack of this order might be at a value of 0.7900. |
| 19 | Cease lack of order grid: Grasp SL value – cease lack of every order is about to the cease loss value of the grasp order. | the grasp order has a cease loss at a value of 1.9453, accordingly the cease lack of every grid order might be set at a value of 1.9453. |
| 20 | Cease lack of order grid: Grasp SL factors – the cease lack of every order is about on the distance that the cease lack of the grasp order has. | Cease lack of the grasp order in factors is the same as 100 factors, respectively The primary grid order purchase opened at a value of 1.0000 may have a cease loss at a value of 0.9900, The second grid order purchase opened at a value of 0.9000 may have a cease loss at a value of 0.8900, The third grid order purchase opened at a value of 0.8000 may have a cease loss at a value of 0.7900. |
Find out how to open a number of orders or positions in a single click on
- Set the variety of extra orders or positions 3,4 and their quantity 5-9.
- Set Step = 0 (10).
- Set the calculation methodology of TP and SL of extra orders or positions.
- Open a place or order in response to the directions above.
- After the place or order (master-order) is opened, the panel will open extra positions or orders. The sort and value of the order or place opening would be the similar because the master-order.
Find out how to open an order grid
- Set the order grid sort (Cease or Restrict) 1,2.
- Set the variety of orders within the grid 3,4 and their quantity 5-9.
- Set the step between grid orders 10-12.
- Set the calculation methodology for TP and SL of grid orders.
- Open a place or order in response to the directions above.
- After a place or order (grasp order) is opened, the buying and selling panel will open the order grid. The master-order would be the first order of the grid.
“Different” tab
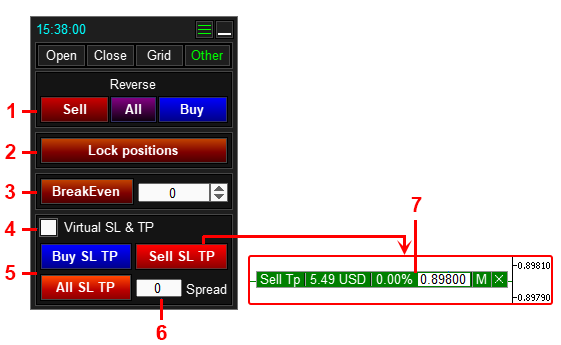
- Reverse positions:
- Promote– the panel will shut all Promote positions and open one Purchase place with a quantity equal to the quantity of closed Promote positions.
- Purchase – the panel will shut all Purchase positions and open one Promote place with a quantity equal to the quantity of closed Purchase positions.
- All – the panel will shut all Purchase and Promote positions, open one Promote place with a quantity equal to the quantity of closed Purchase positions, open one Purchase place with a quantity equal to the quantity of closed Promote positions.
- Lock positions. The panel will open a further place that can make the volumes of Purchase and Promote positions equal.
- Set SL of every place to the opening value of the place. Within the area – the worth of the SL offset from the opening value of the place.
- Change Digital SL and TP.
- Set TP and/or SL to the frequent stage:
- Purchase SL TP– set TP or SL of Purchase positions to the frequent stage.
- Promote SL TP– set TP or SL of Purchase positions to the frequent stage.
- All SL TP– set TP and SL of Purchase and Promote positions to the frequent stage.
- Distance between TP Purchase and SL Promote or TP Promote and SL Purchase (just for the All SL TP button).
- A label with a line indicating the extent at which Cease Loss or Take Revenue might be set. Displayed after urgent the 5 button.
Find out how to reverse positions
Find out how to lock positions
Find out how to set cease lack of every place to the breakeven value of the place (the opening value of the place).
Find out how to set Cease Loss or Take Revenue of positions to the overall stage
To set Take Revenue or Cease Lack of Purchase positions to the overall stage, click on the Purchase SL TP button. Transfer the label that seems on the chart to the specified stage and click on the Modify button.
To set Take Revenue or Cease Lack of Promote positions to the overall stage, click on the Promote SL TP button. Transfer the label that appeared on the chart to the specified stage and click on the Modify button.
To set Take Revenue of Promote positions and Cease Lack of Purchase positions, or to set Cease Lack of Promote positions and Take Revenue of Purchase positions to the overall stage, click on the All SL TP button. Transfer the label that appeared on the chart to the specified stage and click on the Modify button. If needed, set the indent between Cease Loss and Take Revenue within the area 6.
To vary the digital Cease Loss and Take Revenue, allow the checkbox 4.
Panel for Danger Supervisor and Buying and selling Report
Commerce report
The tab is meant for analyzing buying and selling outcomes.
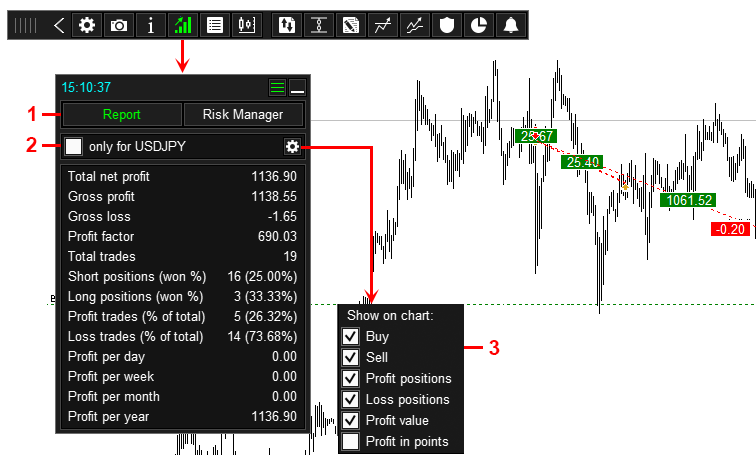
- Tab Commerce Report.
- Present report solely from present image.
- Present outcomes of closed trades on chart.
For MetaTrader 5, the buying and selling report is generated primarily based on the whole buying and selling historical past.
For MetaTrader 4, the buying and selling report is generated primarily based on the record of closed orders from the Account Historical past tab of the Terminal.
Danger supervisor
The tab is designed to regulate the danger on the buying and selling account.
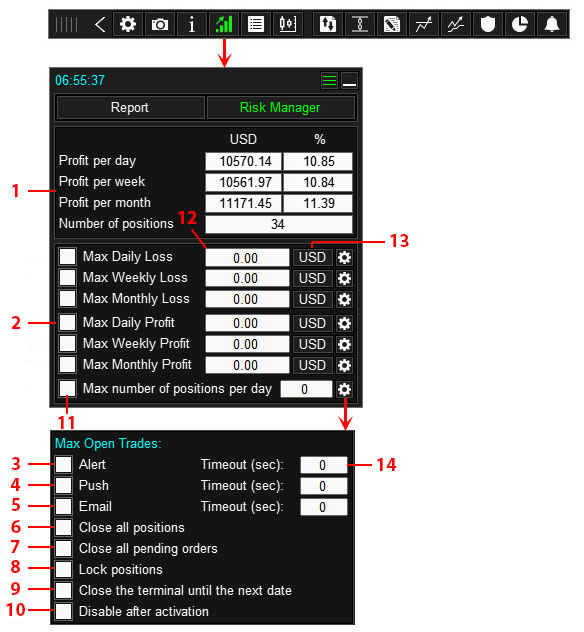
- Present revenue within the deposit forex, in % of the steadiness, and the variety of open positions on the present day.
- Circumstances for activating the danger supervisor.
- When the situation is activated, show a message on the chart.
- When the situation is activated, ship a notification to the cell terminal (smartphone). *
- When the situation is activated, ship a message to EMAIL. **
- When the situation is activated, shut all positions on the buying and selling account.
- When the situation is activated, delete all pending orders on the buying and selling account.
- When the situation is activated, lock all positions on the buying and selling account (open extra reverse positions that can equalize the volumes of Promote and Purchase positions).
- When the situation is triggered, shut the terminal and prohibit its opening till the subsequent date.
- When the situation is activated, carry out all enabled actions and disable the circumstances (apply the motion solely as soon as).
- Allow the danger supervisor situation.
- A area for getting into the Revenue (Loss) quantity, upon exceeding which the set threat supervisor motion might be activated. In every area you possibly can enter each a constructive and a adverse worth (with a minus signal), and the entered worth might be used as is.
- Button for switching the unit of measurement of Revenue (Loss) (within the deposit forex or %).
- Frequency of sending messages. If the worth is 0, the message might be despatched 1 time.
For mt4 right here.
For mt5 right here.
** This kind of notification requires extra settings within the terminal. You could enable purposes to ship electronic mail and supply your electronic mail deal with. The place to set it up:
For mt4 right here.
For mt5 right here.
Find out how to set up threat supervisor
- Choose the circumstances for activating the danger supervisor 2 and go to its settings.
- Within the settings, specify the motion that the panel will carry out if the situation is activated 3-9.
- Allow checkbox 10 if the danger supervisor needs to be used solely as soon as (after activation and execution of the motion, the danger supervisor for the chosen situation might be disabled).
- Enter the worth upon reaching which the danger supervisor is activated 12 (in case you enter a adverse quantity, enter it with a minus signal).
- Allow checkbox 11.
Panel for OCO orders
The panel is designed for putting OCO orders.
OCO orders are two pending orders interconnected by a mutually canceling perform: when one order is executed, the second order is deleted.
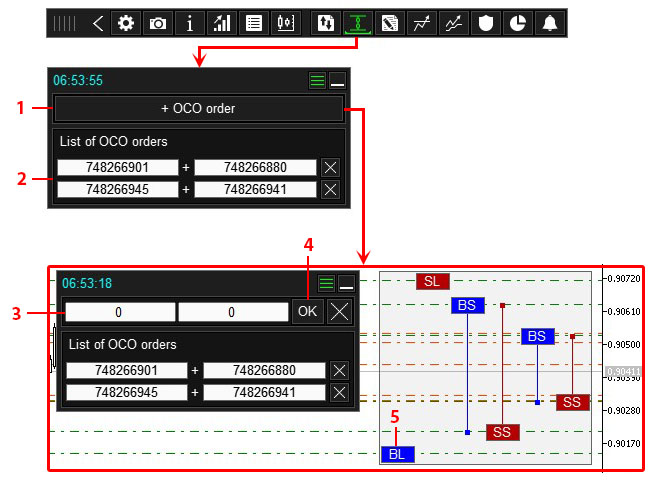
- Button for creating an OCO order.
- Checklist of put in OCO orders.
- Fields for getting into order tickets that might be linked within the OCO order.
- Button for putting in an OCO order.
- Order labels.
Find out how to create an OCO order
- Click on the “+OCO order” button 1.
- Enter the ticket numbers within the fields 3, or choose orders utilizing the labels 5 (click on on the labels of the required orders).
- Click on the OK button 4.
Panel for Normal shut
The panel is designed to shut orders when the whole revenue or lack of positions reaches a specified worth.
The panel consists of two tabs:
- All symbols – is designed to shut orders on all symbols.
- Solely XXXXXX – is designed to shut orders solely on the present image.
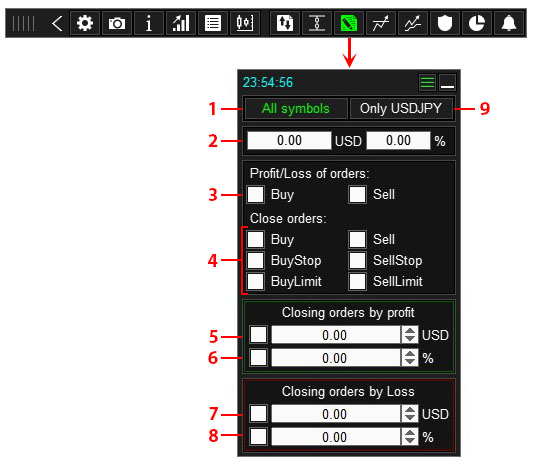
- A tab for organising the perform of closing orders and positions for all symbols. The perform on this tab takes under consideration the revenue of all positions on the account. When the required revenue or loss is reached, the perform will shut all orders and positions on the buying and selling account.
- Present revenue within the deposit forex and in % of the steadiness for the chosen positions.
- The kind of positions whose revenue might be taken under consideration within the perform.
- The kind of positions and orders that might be closed when the perform is activated.
- Shut orders and positions when the required revenue within the forex is reached. *
- Shut orders and positions when the required revenue in % of the steadiness is reached. *
- Shut orders and positions when the required loss in forex is reached. *
- Shut orders and positions when the required loss in % of steadiness is reached. *
- A tab for organising the perform of closing orders and positions for the present image. The perform on this tab takes under consideration the revenue of positions opened on the present image. When the required revenue or loss is reached, the perform will shut orders and positions on the present image.
* In every area you possibly can enter each a constructive and a adverse quantity. A adverse quantity have to be entered with a minus signal.
Find out how to set the perform of closing orders and positions when a specified revenue or loss is reached
- Go to the “All Symbols” tab 1 to account for income and shut orders and positions on all symbols. Go to the “XXX Solely” tab 9 to account for income and shut orders and positions on the present image solely.
- Choose whose revenue will activate the perform 3.
- Choose which sorts of orders and positions the perform will shut when activated 4.
- Enter the quantity of revenue or loss, upon reaching which the perform might be activated 5-8 and allow the checkbox to start out the perform.
Panel for Setting duties
The panel is designed to set duties for opening and shutting orders. The duty is activated when the required time is reached or when the worth touches the road set on the chart.
- Process sort.
- Process activation situation:
- Development line – the duty is activated when the present value touches the pattern line.
- Horizontal line – the duty is activated when the present value touches the horizontal line.
- Time – the duty is activated when the required time is reached (the time is indicated by a vertical line).
- Process activation – the duty is activated when one other process is activated (chosen from the already set duties).
- Technique of touching the present value of the duty line (just for pattern and horizontal strains).
- Activate the duty after the worth rolls again to the road (just for pattern and horizontal strains):
- “Rollback – bar shut” – when this feature is enabled, the duty might be activated when the next consecutive occasions happen:
- the worth crosses the road and the bar closes on the other aspect of the road.
- then, after breaking the road, the worth rolls again to the road and touches it (contact by the chosen methodology).
Multiple bar can shut behind the road, this doesn’t cancel the duty.
- “Rollback – factors” – when this feature is enabled, the duty might be activated when the next sequential occasions happen:
- the worth crosses the road and strikes away from the road by the required distance in factors (area 1).
- then, after breaking the road, the worth will roll again to the road and contact it (contact by the chosen methodology).
The value could transfer away from the road by greater than the required distance, this doesn’t cancel the duty.
- “Rollback – bar shut” – when this feature is enabled, the duty might be activated when the next consecutive occasions happen:
- Delete process:
- Delete process when specified time is reached.
- Delete process when specified Bid value is reached.
- Delete process when specified Ask value is reached.
- Colour of the duty line.
- Remark for the order.
- The strategy of calculating the order quantity and the sphere for getting into the danger.
- Calculated order quantity.
- Repair the ratio between SL and TP.
- Fields for getting into TP and SL.
- Revenue/Loss when TP and SL are triggered.
- Button for setting the duty.
- Kind of order or place to be opened or closed.
Find out how to set a process
- Choose the duty sort (open or shut).
- Choose the order or place sort 14.
- Choose the activation circumstances 2. For strains – set to the required stage, for “Process activation” choose the duty.
- For strains, if needed, allow contact on Rollback 4.
- If needed, allow the circumstances underneath which the duty might be deleted 5.
- Set the colour of the duty line.
- For a process to open an order or place, set its parameters 7-11.
- Click on the OK button 13.